In todays lab you will be using the dissecting microscope. Despite their sturdy appearance, all microscopes are delicate, precision instruments. They should be handled carefully and with common sense. The following suggestions will help you avoid some common mishaps.
**To avoid dropping the microscope or banging it against a laboratory bench, carry the microscope in an upright position using both hands.
**When carrying the microscope, place one hand on the base and the other hand around the arm
**DO NOT PLACE THE MICROSCOPE IN AN UPSIDE DOWN POSITION. PIECES WILL FALL OUT.
**Keep microscope away from the edge of the bench, particularly when not in use.
**Make sure power cords are out of the way.
**Never force the microscope parts to work.
**Never dismantle the microscope.
**Use lens cleaners and paper both before and after use.
**Take all slides off the stage prior to storage.
**Always store the microscope in low power objective.
**Place cover over the microscope after each use.
**Bring all defective microscopes to your instructors attention.
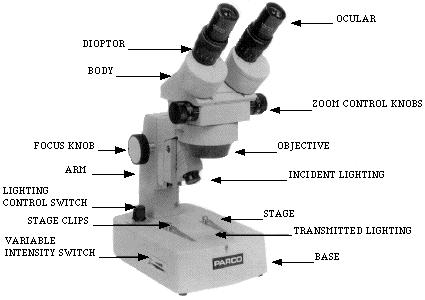
Parts of the Microscope
Oculars:The oculars or eyepiece are the lenses you look through. As with a pair of binoculars, you can adjust the 2 oculars to match the distance between you eyes. Oculars of different microscopes may have different magnifications; usually the magnification is imprinted on the ocular.
Dioptor: The diopters are used to focus the oculars in conjunction with each other to give equal sharpness for both eyes.
Body: The body is the portion of the microscope between the upper optical element and the objective.
Zoom Control: The zoom knob will allow you to change the amount of magnification needed.
Objective: The objective is the lower component of the optical system. Responsible for initial magnification and resolution.
Focus Knob: Use the foucs knob to bring the sample or specimen in focus. The body will move up or down to bring the specimen into focus.
Stage: The stage is the rectangular platform of the microscope where the specimen to be viewed is placed.
Stage Clips: These clips will hold the slide in place if needed.
Arm: The is the frame of the microscope that supports all component parts above the base. This is also used as a "handle" to hold the microscope.
Base: The base is the stand that rests on the table surface and supports the instrument. This also is another "handle" when transporting the microscope.
Variable Intensity Switch:
This is the means for controlling the amount of light that is used to illuminate
your specimen.
SHOULD YOU WEAR YOUR GLASSES WHEN USING A MICROSCOPE?
Yes and no. If you are nearsighted or farsighted, there is no need to wear your glasses. Remember your are focusing the microscope to your eyesight and this will compensate for any "human" focusing problems. If you have an astigmatism, wear your glasses since the microscope will not correct for this problem.
FOCUSING OF THE DISSECTING MICROSCOPE:
The whole point in using a stereoscopic microscope is that, when properly adjusted, the observer sees the object in three dimension and can perceive heights and depths on the specimen.
To achieve these desirable height /depth effects the images coming from the binocular eyepieces must be "fused" into a single image by the observer. Using the microscope is like using a pair of binoculars. This requires some practice and careful setting of the binocular body. Remember to use both eyes!! Use these steps to focus the microscope:
1) Move the eyepiece tubes in and out to find the place where the distance between the eyepieces match the distance between the pupils of your eyes. When these distances are equal or match each other, one central image will be seen.
2) Set the microscope magnification to the highest power by turning the zoom control counter clockwise.
3) Focus sharply on the specimen.
4) Set to the lowest magnification by turning the zoom control clockwise. Do not touch the focusing control.
5) Looking with the right eye through the right ocular, turn the eyepiece's diopter adjustment ring until the image is precisely in focus.
6) Do the same with the left ocular and the left side eyepiece.
7) The focused microscope image should be uniformly sharp throughout the zoom range and need no further focusing.
Now have some fun and take a look at some of the objects
that were provided for you to observe under the dissecting microscope.
MOVE AHEAD TO THE DAPHNIA EXPERIMENT