
OBJECTIVE:
In this lab you will learn the basic skills needed
to stain and mount wet slides. You will also learn about magnification,
resolution and the parts of the compound microscope.
INTRODUCTION:
The light microscope can extend our ability to see detail by 1000 times, so that we can see objects as small as 0.1 micrometer (um) or 100 nanometers (nm) in diameter. The transmission electron microscope extends this capability to objects as small as 0.5 nm in diameter, 1/200,000th the size of objects that are visible to the naked eye. Without microscopes, our understanding of the structures and functions of cells and tissues would be severely limited.
Revealing the structure of small objects, however, is not so much a function of the microscope's ability to magnify as of its ability to distinguish detail. Merely magnifying an object, without increasing the amount of detail seen, is of little value to the observer. The ability to distinguish detail is called resolution or resolving power, and depends on the wavelength of light used and on a value called the numerical aperture (NA) a characteristic of microscopes that determines how much light enters the lens. In its simplest form, resolution can be expressed by the formula:
Under normal conditions, resolution is increased by decreasing the wavelength of the light source; e.g., if you use a green filter that permits light with a wavelength of 500 nm to pass through a microscope lens with a NA of 1, then the resolution is 500 nm / 2 x 1, or 250 nm. This means that you can see 2 objects that are at least 250 nm apart as 2 distinct objects; objects closer together than 250 nm will appear fuzzy or as one object. If you use a blue light (or a blue filter that provides light at a wavelength of 400 nm) and a lens having an NA of 1, the resolution would be equal to 400 nm / 2 x 1, or 200 nm. The 2 objects observed under these conditions could be 50 nm closer together than those seen with a green filter and still be seen as 2 separate objects.
Knowing the significance of the wavelength of light
in the ability to distinguish detail, you can appreciate the role of electron
microscopes and microscopes that use ultraviolet light in defining the
structure and function relationships of cells and organelles (sub cellular
structures).
PROPER USE OF MICROSCOPES:
In todays lab you will be using the compound microscope.
Despite their sturdy appearance, all microscopes are delicate, precision
instruments. They should be handled carefully and with common sense.
The following suggestions will help you avoid some common mishaps.
**To avoid breaking a cover slip and/or microscope slide while focusing (more importantly scratching a lens), first locate the specimen using the low-power objective, and then switch to the higher power objective.
**Never focus the high power objective with the coarse adjustment knob, and never use these lenses when examining thick specimens or whole mounts of specimens.
**To avoid dropping the microscope or banging it against a laboratory bench, carry the microscope in an upright position using both hands.
**When carrying the microscope, place one hand on the base and the other hand around the arm.
**DO NOT PLACE THE MICROSCOPE IN AN UPSIDE DOWN POSITION. PIECES WILL FALL OUT.
**Keep microscope away from the edge of the bench, particularly when not in use.
**Make sure power cords are out of the way.
**Never force the microscope parts to work.
**Never dismantle the microscope.
**Use lens cleaners and paper both before and after use.
**Take all slides off the stage prior to storage.
**Always store the microscope in low power objective.
**Place the cover over the microscope after each use.
**Bring all defective microscopes to your instructors
attention.
PARTS OF A COMPOUND MICROSCOPE:
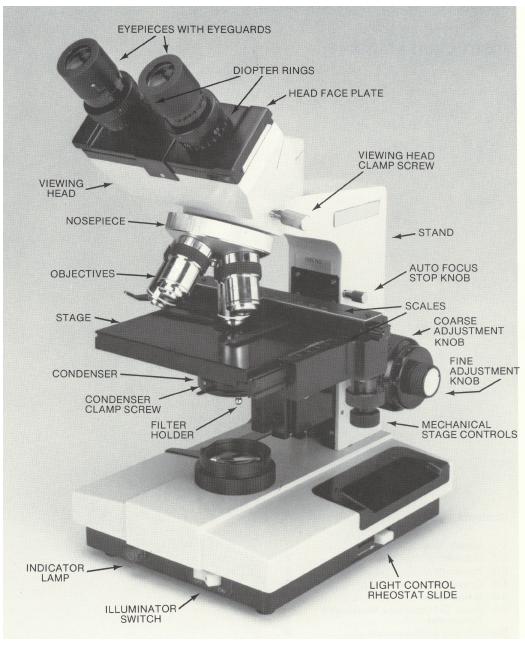
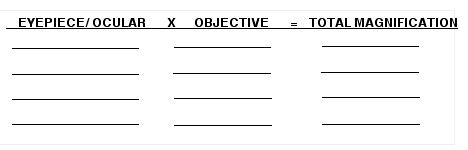
Eyepiece/Ocular Lens: The eyepieces are the lenses you look through. The eyepiece of most binocular microscopes can be adjusted to match the distance between the eyes of different observers (interpupillary adjustment). Other microscopes may have different magnifications which are stamped on the side of the eyepiece. Most are 10X. You may have to remove the eyepiece from its holder to determine its magnification.
Record the magnifying power of the eyepiece.________________
Body Tube: Light travels from the objectives through a series of magnifying lenses in the body tube to the ocular. In some microscopes, the body tube is straight; in others, the oculars are held at an angle. The body tube contains a prism that bends the light rays so that they will pass through the oculars.
Objective Lens: Attached to a rotating nose piece, or turret, at the base of the body tube are a group of 3 or 4 objectives. Locate the turret and notice a click as each objective snaps into position.
The objective lenses focus the light that comes through the specimen, up the body tube, and through the oculars. Each objective has numbers stamped on it. One of these numbers identifies the magnification of the objective (e.g., 43X). Objective lenses are usually named according to their magnifying power, as follows:
scanning power 4X; low power 10X; high power 43X; oil immersion 93X or 100X
A 2nd number on the objective, usually a decimal
represents the numerical aperture for that lens; the abbreviation NA may
precede the number.
Note the magnification of each of the objectives on your microscope below.
___________ ___________ ___________ ___________
The total magnification for each objective is calculated
by multiplying the magnification of the ocular and objective lens on your
microscope. On your worksheet below calculate the total magnification for
each ocular/objective combination on your microscope.
Stage: The surface or platform on which you place the microscope slide is the stage. Note the opening (stage aperture) in the center of the stage. On some microscopes, the stage is stationary and has clips to hold the slide in place. On other microscopes, the stage is movable and is called a mechanical stage. Movement is controlled by 2 knobs located on the top, side, or bottom of the stage. Note the horizontal and vertical scales on the mechanical stage.
Substage: The area under the stage, called the substage, may contain a diaphragm, a condenser, or both.
Diaphragm: The diaphragm regulates the amount of light passing from the light source through the specimen and through the lens system of the microscope. By properly adjusting the diaphragm, you can provide better contrast between the surrounding medium and your specimen, thus greatly improving your image of the specimen. The diaphragm may be either annular or iris. An iris diaphragm consists of a circle of overlapping thin metal plates. The lever that projects from the side of the diaphragm opens and closes these plates, thereby regulating the amount of light that enters the microscope. Most of you have a microscope with an iris diaphragm. An annular diaphragm consists of a circular plate with holes of different diameters. You can rotate this plate to place the various holes in the light path, thereby regulating the amount of light that passes from the light source through the specimen.
Condenser: The condenser consists of a series of lenses that focus light onto the specimen. It is moved up and down by a knob at its side or by a lever projecting from the condenser housing. By properly adjusting the condenser, you can greatly improve the clarity of the specimen A filter holder may be attached to the bottom of the condenser. It usually contains a blue filter.
The Light Source: Your microscope has an illuminator built into the base of the microscope and controlled by an on/off switch. You can control the amount of light entering the specimen by adjusting the diaphragm. You can also control the light intensity by adjusting the voltage of a transformer attached to the illuminator. Use low or medium voltage settings for most microscopic observations. You will need a higher setting when using the oil-immersion lens.
Some compound microscopes have an attached mirror instead of a built-in illuminator. The mirror is usually concave on 1 side and flat on the other. The flat side of the mirror is usually used with the scanning and low-power objectives. The concave mirror is used with the higher power objectives. The light source for the mirror is usually a lamp; natural light can be used but it is not preferred because its intensity is too variable.
You can focus your microscope by using the coarse
and fine adjustment knobs; these raise or lower either the body tube or
the stage, depending on the type of microscope you are using. Try
this with the low-power objective in position, about 1/4 inch above the
stage. Rotate the coarse adjustment knob 1/4 turn clockwise while
watching the low-power objective. Do the same with the fine adjustment
knob.
USING A COMPOUND MICROSCOPE:
Before using your microscope, thoroughly clean the oculars and objectives with lens paper. Use a circular cleaning motion to avoid scratching the lens. When using the microscope, keep your eyelashes from touching the ocular:because oil from your lashes will adhere to the oculars and smear them. (Students should avoid wearing mascara in microscopy labs.) Thoroughly clean the stage and microscope slides to prevent damage to the microscope.
Focusing
1. Clean the oculars and objectives using lens paper.
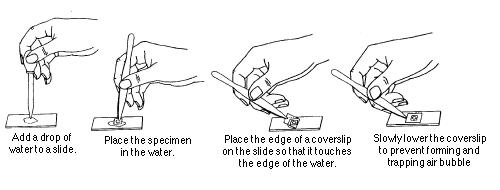
2. Cut out a letter "e" from a newspaper or other printed page. Clean a microscope slide and prepare a wet mount of the letter, using the procedure described below.
3. Put the scanning (4x) objective in position, and then place the slide on the stage in its normal viewing position.
4. Turn on the illuminator and open the diaphragm fully. If there is a condenser, position it as high as it will go, so that the top lens of the condenser unit is level with the stage aperture. Center the specimen over the stage aperture.
5. Position the scanning objective (4x) as close to the slide as possible; then, while looking through the oculars, use the coarse adjustment knob to back off slowly until the specimen comes into focus.
6. Use the diaphragm (and/or the transformer voltage regulator) to adjust the light intensity as necessary, and again center the specimen by moving the slide.
7. Switch from the scanning lens (4x) to the low-power objective (10x). Make certain the objective clicks into position. If the specimen stays in focus, your microscope is parfocal. Parfocal means that the microscope has been designed in such a way that once the specimen is clearly focused and centered it remains in focus while changing objectives, You can sharpen the focus by small adjustments of the fine adjustment knob.
If your microscope is not in focus after changing objectives, you may have to use the coarse adjustment knob and then the fine adjustment knob. But remember, do not do this with the high-power or oil-immersion objectives in position. Ask your instructor for help if you have difficulty focusing your microscope.
Recenter the specimen, adjust the diaphragm, and adjust the position of the condenser to increase the contrast of the specimen.
8. Switch to the high-power objective (43x) and adjust the focus using the fine adjustment knob.
These procedures are usually used when examining
a wet mount or a commercially prepared microscope slide. Always use
clean microscope slides. Always proceed from the lowest power to
the highest power objectives, making minor focus and light corrections
as necessary. Learn to fine-tune your microscope.
The Microscopic Image:
The image that you see in the microscope is affected by several factors: the orientation of the image, the total magnification, the size and brightness of the field of vision, the plane of focus, the depth of focus and the contrast of the specimen.
a. Orientation of the Image
Hold your slide of the letter "e" so that the letter
is in a normal reading position. Then place it on the stage in that position
and examine it with the low-power objective. Move the image to the right,
left, upward, and downward, and notice the direction in which you have
to move the slide.
Draw how the "e" appears under the microscope._______________________
When you want to point out something of interest in the field of vision to someone, you can describe its approximate location by referring to the field of vision as a clock. Thus, you could tell them to "look at 3 o'clock", or "look just off-center toward 3 o'clock", and so forth. Alternatively, in some microscopes, a thin black line appears to cut across the field. This is a pointer that has been added to the ocular of your microscope so that you can point out something by moving the object under observation to the end of the pointer.
b. Brightness of the Field of Vision
and Working Distance
Examine your slide, starting with the lowest power
objective and progressing to the highest power objective (do NOT use the
oil-immersion objective). Note any changes in the brightness of the
field when you change objectives. When the object on your slide is
in focus for each objective, the distance between the slide and the objective
lens, the working distance, decreases as the objective magnification increases.
c. Depth of Focus
Like the human eye, the lenses of your microscope
provide a limited depth of focus. This means that only part of the
object will be in sharp focus; areas above and below that plane will be
slightly out of focus or not in focus at all.
To visualize 3-dimensional form and the concept of depth of focus, place a commercially prepared slide on your microscope in which 3 differently colored threads have been mounted in such a way that they cross over one another. (Note that you do NOT have to place water and a cover slip on a commercially-prepared slide.) Using the lowest power objective, focus on the point at which the strands intersect and determine the depth of focus at this magnification.
Switch to a higher power objective. At this higher magnification, it is difficult but not impossible to determine 3-dimensional form. You can do this by building a series of optical sections in your mind as you focus through the specimen.
Try to determine the 3-dimensional structure of your preparation at high power by visualizing a series of optical sections. Begin by focusing on the surface of the top thread and work through to the lower surface of the bottom thread.
What color thread is on the top?_____________________
What color thread is in the middle?____________________
What color thread is on the bottom?____________________
d. Magnification and Measurement
The approximate size of a specimen can be estimated
by comparing it to the diameter of the field of vision. The field
of vision is what you can see when looking through the microscope.
To estimate the diameter of the field of vision
take a 15cm, transparent ruler and focus it under the scanning objective.
Align the edge of the ruler with the edge of the field of view. Then measure
the width of the field of view. Remember that the increments of the
ruler is in millimeters. So count the number of lines from left to
right of the field of vision. If the field ends between two lines
do your best to estimate a fraction.
What is the diameter of the scanning field of view in millimeters?______________________
What is the diameter of the low power field of view in millimeters?____________________
What is the diameter of the high power field of view in millimeters?___________________
e. Contrast
Even with sufficient magnification and resolution,
you can visualize an object under a microscope only if there is sufficient
contrast between the object and its surroundings or between the various
parts of the object.
You can improve image contrast by regulating the opening of the diaphragm. This deflects the light rays from the edge of the diaphragm and causes them to enter the specimen at an angle. Such scattering makes the specimen look darker.
Cells and sub cellular structures may contain natural
pigments (e.g., chlorophyll in chloroplasts and hemoglobin in red blood
cells) that provide contrast and make these structures visible. However,
many cells and parts of cells are translucent. One way you can improve
contrast is to use dyes or stains that bind to or are taken up by various
sub cellular structures, which then absorb enough light to provide contrast.
STUDY OF PROTOZOA AND ALGAE:
In your laboratory work with the microscope, many of your observations will be of living organisms or tissues or parts of organisms that you will want to keep alive. To allow them to dry out greatly distorts them, to say nothing of the effect death has on a study of their movements.
To observe living material, prepare a wet mount of a drop of water containing protozoa or algae provided your instructor. (Since your specimen is already immersed in water, there is no need to add tap water in making your wet mount. However, if your preparation begins to dry out while under observation, add 1 drop of water at the edge of the cover slip.)
Excess water under the cover slip can be soaked up by carefully touching a piece of tissue (Kimwipe) to the edge of the cover slip.
Prepare additional wet mounts from the other samples provided by your instructor. Do not be too hasty in discarding a slide because you don't find any microorganisms; a systematic survey of the preparation is often necessary to locate them.
Try to identify the microorganisms you observe, using books on the instructors bench.
To identify the smaller organisms, you may have
to use the high-power objective. If the organisms are moving too
fast mix a drop of protoslow with your sample.
STUDY OF PLANT CELLS:
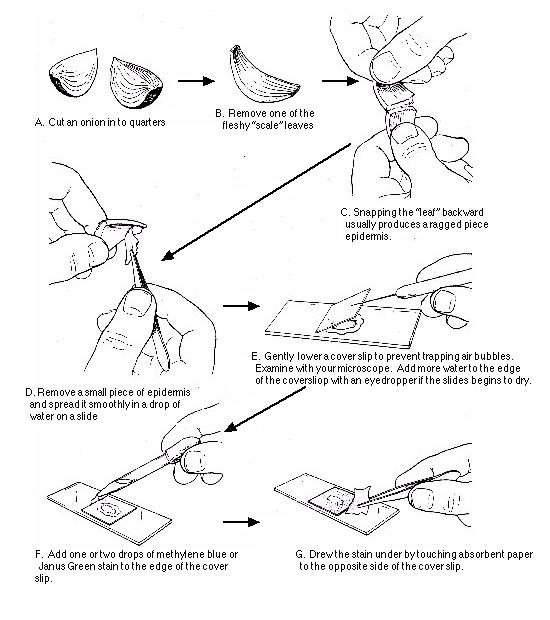
Prepare a wet mount of onion epidermal tissue, following the procedure demonstrated below. Examine this tissue under low power objective.
The "lines" that form the network between the cells are non,living cell walls composed chiefly of cellulose. The cell wall surrounds the plasma membrane, which encloses the cytoplasm. The central part of many plant cells (which is difficult to observe in living cells) is taken up by a vacuole that is filled with water and salts.
Next examine the cells under high power. Locate the nucleus, which appears as a dense structure in the translucent cytoplasm. Note that in some cells, the nucleus looks circular and seems to be lying in the central part of the cell. In other cells it seemes to be compressed and pushed against the cell wall.
The central vacuole, nucleus, and cell wall are separated from the cytoplasm by membranes, but the membranes are difficult to observe in the preparation that was used.
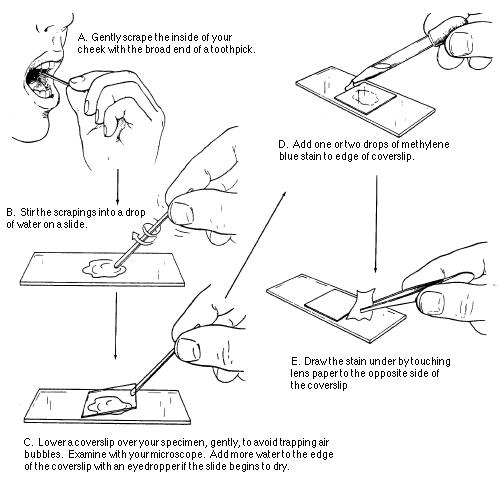
STUDY OF CHEEK CELLS:
Follow the instructions below to examine epithelial cells obtained from the inner lining of your cheek. First, try to determine something of their structure by adjusting the diaphragm and the condenser. Next, add a drop of methylene blue stain to the edge of the cover slip and draw it under as shown in figure below
MICROSCOPE
LAB QUESTIONS CLICK HERE![]()
FOR A FULL PRINT OUT OF THIS
LAB ......CLICK HERE ![]()
![]()